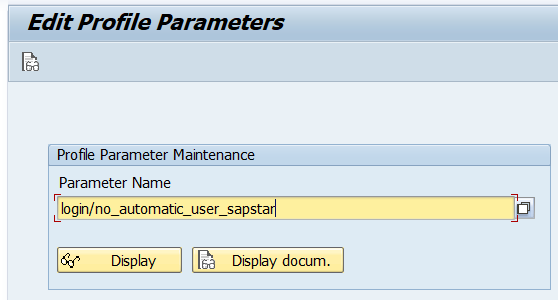
ARP ( Address Resolution Protocol ) 이란 논리적인 IP 주소 ( L3, 네트워크 계층 )를 실제 물리 주소인 MAC 주소 ( Media Access Control / L2, 데이터링크 계층 )로 바꾸어 주는 역할을 하는 '주소 해설 프로토콜' 이다.
처음 통신을 시작할 때는 상대방의 MAC Address를 모르기 때문에 ARP 프로토콜을 사용하여 상대방의 MAC 주소를 알아낸다.
반대로, MAC 주소를 IP 주소로 바꿔주는 역할을 하는 프로토콜을 RARP ( Reverse Address Resolution Protocol ) 이라 한다.
✔ IP 주소 ? 인터넷에 연결되어 있는 모든 호스트나 라우터 장비의 인터페이스에 할당된 논리적인 주소 ✔ MAC 주소 ? 물리적인 네트워크 주소로, 네트워크 인터페이스 카드 ( NIC ) 에 할당된 하드웨어 고유 식별 번호
2. ARP를 사용하는 이유
두 단말 간 통신을 위해서는 IP 주소와 MAC 주소를 이용하는데, IP 주소와 MAC Address와 매칭을 통해 목적지 IP의 단말이 소유한 MAC 주소로 찾아 갈 수 있다.
비유를 들면, 논리적인 IP 주소는 사람의 이름이고 물리적인 MAC 주소는 주민등록번호기 때문에 동일한 이름 ( IP Address ) 이더라도 주민등록번호 ( MAC Address )를 통해 구별 ( 통신 ) 이 가능해진다.
✔ IP 주소만 사용할 수 없는 이유
IP는 논리적인 주소이기 때문에 가변적이다. 사람의 이름처럼 동명이인일 수도 있고, 개명을 할 수 도 있기 때문에 IP 주소만으로는 통신이 불가능하다.
✔ MAC 주소만 사용할 수 없는 이유
라우터를 통해 전 세계의 PC와 통신하기 위해서는 각 MAC 주소를 등록해야 되는데 저장 공간의 한계가 있다.
각각의 주소만 사용하지 못하는 문제를 해결하기 위해 여러 대의 단말을 묶어 IP 주소로 만들고 MAC 주소를 거치는 ARP를 사용하게 되었다.
3. ARP 프로토콜 동작 순서
✔ ARP 프로토콜은 같은 네트워크에 있을 때와 그렇지 않을 때 다르게 동작한다.
✔ 같은 네트워크 내에 있는 단말들의 MAC 주소는 스위치와 같은 중계 장치가 MAC 주소 테이블에 정보를 저장하고 관리하고 있어 통신이 가능하다.
Case 1 ) 같은 네트워크에 속해 있는 경우
같은 네트워크 내에 있는 단말들의 MAC 주소는 중계 장치 (ex. Switch )가 주소 테이블 정보를 저정하고 관리하고 있기 때문에, 해당 정보를 이용해 통신이 가능하다.
A가 B와 통신하기 위해 브로드캐스팅 방식을 이용해 ARP Request를 전송한다. 이 때, B의 MAC 주소를 모르기 때문에 목적지 MAC주소를 브로드캐스트로 설정하여 전달한다
ARP Request Packet을 받은 Switch가 B의 MAC 주소를 가지고 있지 않다면 자신의 모든 포트에 연결된 단말에 ARP Request Packet을 전달 한다.
ARP Request를 전달 받은 C는 패킷을 확인 후 자신에게 온 요청이 아니기에 패킷을 폐기하고, B는 Request Packet 정보를 활용해 Reply Packet을 전달한다.
Reply Packet을 통해 B의 정보를 알게 된 A는 해당 정보를 이용해 B와 통신하고, ARP Table에 B의 IP 주소와 MAC 주소를 대응시켜 저장한 뒤, 추후에 사용하게 된다.
ARP Table 정보는 아래의 명령어로 조회 할 수 있다.
NT : arp -a
Linux : arp -v
Case 2 ) 다른 네트워크에 속해 있는 경우
중계 장비에서 보관하는 MAC 주소 테이블에는 다른 네트워크에 속해있는 단말의 MAC 주소가 없기 때문에 ARP 프로토콜을 이용해 IP 주소와 MAC 주소간 변환을 이용해 통신을 수행한다.
A는 B와 통신을 위해 같은 네트워크 대역에 브로드캐스팅 방식으로 ARP Packet을 전달한다. 이 때, 목적지 B의 MAC 주소를 모르기 때문에 기본 게이트웨이로 설정하여 전달한다.
라우터는 해당 ARP Request Packet을 받고 목적지 B의 IP가 같은 네트워크에 있지 않음을 확인하고, A와 같은 네트워크 대역의 라우터 인터페이스 MAC 주소를 실어서 응답한다.
A는 B와 통신하기 위해 B의 IP와 응답 받은 라우터의 MAC 주소를 실어 라우터에게 ARP Request를 전달한다.
라우터는 B의 IP 대역으로 패킷을 보낸 뒤, 자신도 목적지의 MAC 주소를 확인하기 위해 브로드캐스트 메시지를 전달해 요청 IP를 가진 단말이 있는지 확인한다.
B 단말은 자신의 IP가 목적지인 패킷을 확인하고 자신의 MAC 주소를 실어서 응답한다.
이 후, 라우터를 통해 A와 B는 통신을 시작한다. 이렇게 얻어진 MAC 주소는 일정 시간 동안 저장되어 사용되고, 이를 ARP Cache라고 한다.
[root@localhost ~]# fdisk /dev/sdb
Welcome to fdisk (util-linux 2.23.2).
Changes will remain in memory only, until you decide to write them.
Be careful before using the write command.
Device does not contain a recognized partition table
Building a new DOS disklabel with disk identifier 0xb01ddc0b.
The device presents a logical sector size that is smaller than
the physical sector size. Aligning to a physical sector (or optimal
I/O) size boundary is recommended, or performance may be impacted.
Command (m for help): n // 새 파티션 추가
Partition type:
p primary (0 primary, 0 extended, 4 free)
e extended
Select (default p): p
Partition number (1-4, default 1): 1
First sector (2048-104857599, default 2048):
Using default value 2048
Last sector, +sectors or +size{K,M,G} (2048-104857599, default 104857599):
Using default value 104857599
Partition 1 of type Linux and of size 50 GiB is set
Command (m for help): p // (프린트) 현재 파티션 정보 출력
Disk /dev/sdb: 53.7 GB, 53687091200 bytes, 104857600 sectors
Units = sectors of 1 * 512 = 512 bytes
Sector size (logical/physical): 512 bytes / 4096 bytes
I/O size (minimum/optimal): 4096 bytes / 1048576 bytes
Disk label type: dos
Disk identifier: 0xb01ddc0b
Device Boot Start End Blocks Id System
/dev/sdb1 2048 104857599 52427776 83 Linux
Command (m for help): t // (파티션 시스템 id 변경)
Selected partition 1
Hex code (type L to list all codes): 8e // Linux LVM Type Code = 8e
Changed type of partition 'Linux' to 'Linux LVM'
Command (m for help): p
Disk /dev/sdb: 53.7 GB, 53687091200 bytes, 104857600 sectors
Units = sectors of 1 * 512 = 512 bytes
Sector size (logical/physical): 512 bytes / 4096 bytes
I/O size (minimum/optimal): 4096 bytes / 1048576 bytes
Disk label type: dos
Disk identifier: 0xb01ddc0b
Device Boot Start End Blocks Id System
/dev/sdb1 2048 104857599 52427776 8e Linux LVM // LVM으로 변경 완료
Command (m for help): w // 설정값 저장
The partition table has been altered!
Calling ioctl() to re-read partition table.
Syncing disks.
sdc를 이용해 파티션 생성
[root@localhost ~]# fdisk /dev/sdc
Welcome to fdisk (util-linux 2.23.2).
Changes will remain in memory only, until you decide to write them.
Be careful before using the write command.
Device does not contain a recognized partition table
Building a new DOS disklabel with disk identifier 0x3718ceae.
The device presents a logical sector size that is smaller than
the physical sector size. Aligning to a physical sector (or optimal
I/O) size boundary is recommended, or performance may be impacted.
Command (m for help): n
Partition type:
p primary (0 primary, 0 extended, 4 free)
e extended
Select (default p): p
Partition number (1-4, default 1): 1
First sector (2048-104857599, default 2048):
Using default value 2048
Last sector, +sectors or +size{K,M,G} (2048-104857599, default 104857599):
Using default value 104857599
Partition 1 of type Linux and of size 50 GiB is set
Command (m for help): p
Disk /dev/sdc: 53.7 GB, 53687091200 bytes, 104857600 sectors
Units = sectors of 1 * 512 = 512 bytes
Sector size (logical/physical): 512 bytes / 4096 bytes
I/O size (minimum/optimal): 4096 bytes / 1048576 bytes
Disk label type: dos
Disk identifier: 0x3718ceae
Device Boot Start End Blocks Id System
/dev/sdc1 2048 104857599 52427776 83 Linux
Command (m for help): t
Selected partition 1
Hex code (type L to list all codes): 8e
Changed type of partition 'Linux' to 'Linux LVM'
Command (m for help): p
Disk /dev/sdc: 53.7 GB, 53687091200 bytes, 104857600 sectors
Units = sectors of 1 * 512 = 512 bytes
Sector size (logical/physical): 512 bytes / 4096 bytes
I/O size (minimum/optimal): 4096 bytes / 1048576 bytes
Disk label type: dos
Disk identifier: 0x3718ceae
Device Boot Start End Blocks Id System
/dev/sdc1 2048 104857599 52427776 8e Linux LVM
Command (m for help): w
The partition table has been altered!
Calling ioctl() to re-read partition table.
Syncing disks.
2. PV 생성
현재 PV 정보 확인
Command : pvs 혹은 pvdisplay
[root@localhost ~]# pvs
PV VG Fmt Attr PSize PFree
/dev/sda2 centos lvm2 a-- <99.00g 4.00m
[root@localhost ~]# pvdisplay
--- Physical volume ---
PV Name /dev/sda2
VG Name centos
PV Size <99.00 GiB / not usable 3.00 MiB
Allocatable yes
PE Size 4.00 MiB
Total PE 25343
Free PE 1
Allocated PE 25342
PV UUID pnsi31-xuOp-1vcy-DdPy-FQah-27cu-44UgQO
PV 생성
Command : pvcreate [ 파티션 ]
[root@localhost ~]# pvcreate /dev/sdb1
Physical volume "/dev/sdb1" successfully created.
[root@localhost ~]# pvcreate /dev/sdc1
Physical volume "/dev/sdc1" successfully created.
[root@localhost ~]# pvs
PV VG Fmt Attr PSize PFree
/dev/sda2 centos lvm2 a-- <99.00g 4.00m
/dev/sdb1 lvm2 --- <50.00g <50.00g
/dev/sdc1 lvm2 --- <50.00g <50.00g
[root@localhost ~]# pvdisplay
--- Physical volume ---
PV Name /dev/sda2
VG Name centos
PV Size <99.00 GiB / not usable 3.00 MiB
Allocatable yes
PE Size 4.00 MiB
Total PE 25343
Free PE 1
Allocated PE 25342
PV UUID pnsi31-xuOp-1vcy-DdPy-FQah-27cu-44UgQO
"/dev/sdc1" is a new physical volume of "<50.00 GiB"
--- NEW Physical volume ---
PV Name /dev/sdc1
VG Name
PV Size <50.00 GiB
Allocatable NO
PE Size 0
Total PE 0
Free PE 0
Allocated PE 0
PV UUID QYcdtG-Ekpk-1EA4-pCdj-uZpR-qJYk-TDQ22T
"/dev/sdb1" is a new physical volume of "<50.00 GiB"
--- NEW Physical volume ---
PV Name /dev/sdb1
VG Name
PV Size <50.00 GiB
Allocatable NO
PE Size 0
Total PE 0
Free PE 0
Allocated PE 0
PV UUID prU3XO-wXRT-vRIU-h1o5-GZT7-d5wh-gz84Uq
3. VG 생성
현재 VG 정보 확인
Command : vgs 혹은 vgdisplay
[root@localhost ~]# vgs
VG #PV #LV #SN Attr VSize VFree
centos 1 3 0 wz--n- <99.00g 4.00m
[root@localhost ~]# vgdisplay
--- Volume group ---
VG Name centos
System ID
Format lvm2
Metadata Areas 1
Metadata Sequence No 4
VG Access read/write
VG Status resizable
MAX LV 0
Cur LV 3
Open LV 3
Max PV 0
Cur PV 1
Act PV 1
VG Size <99.00 GiB
PE Size 4.00 MiB
Total PE 25343
Alloc PE / Size 25342 / 98.99 GiB
Free PE / Size 1 / 4.00 MiB
VG UUID JWHHLV-TI71-0eJD-OifG-Cvlk-1AN0-zV2fbL
VG 생성
Command : vgcreate [ 볼륨그룹명 ] [ 물리적볼륨 PV ]
[root@localhost ~]# vgcreate vg-volume1 /dev/sdb1
Volume group "vg-volume1" successfully created
[root@localhost ~]# vgcreate vg-volume2 /dev/sdc1
Volume group "vg-volume2" successfully created
[root@localhost ~]# vgs
VG #PV #LV #SN Attr VSize VFree
centos 1 3 0 wz--n- <99.00g 4.00m
vg-volume1 1 0 0 wz--n- <50.00g <50.00g
vg-volume2 1 0 0 wz--n- <50.00g <50.00g
[root@localhost ~]# vgdisplay
--- Volume group ---
VG Name vg-volume2
System ID
Format lvm2
Metadata Areas 1
Metadata Sequence No 1
VG Access read/write
VG Status resizable
MAX LV 0
Cur LV 0
Open LV 0
Max PV 0
Cur PV 1
Act PV 1
VG Size <50.00 GiB
PE Size 4.00 MiB
Total PE 12799
Alloc PE / Size 0 / 0
Free PE / Size 12799 / <50.00 GiB
VG UUID jlwmqy-Jrb4-ekMF-qJXG-kDVG-bT0z-Dp0OFC
--- Volume group ---
VG Name centos
System ID
Format lvm2
Metadata Areas 1
Metadata Sequence No 4
VG Access read/write
VG Status resizable
MAX LV 0
Cur LV 3
Open LV 3
Max PV 0
Cur PV 1
Act PV 1
VG Size <99.00 GiB
PE Size 4.00 MiB
Total PE 25343
Alloc PE / Size 25342 / 98.99 GiB
Free PE / Size 1 / 4.00 MiB
VG UUID JWHHLV-TI71-0eJD-OifG-Cvlk-1AN0-zV2fbL
--- Volume group ---
VG Name vg-volume1
System ID
Format lvm2
Metadata Areas 1
Metadata Sequence No 1
VG Access read/write
VG Status resizable
MAX LV 0
Cur LV 0
Open LV 0
Max PV 0
Cur PV 1
Act PV 1
VG Size <50.00 GiB
PE Size 4.00 MiB
Total PE 12799
Alloc PE / Size 0 / 0
Free PE / Size 12799 / <50.00 GiB
VG UUID WF0CTV-qbC4-PRsE-OeSs-pbOJ-8GrE-61jEEE
4. LV 생성
현재 LV 정보 확인
Command : lvs 혹은 lvdisplay
[root@localhost ~]# lvs
LV VG Attr LSize Pool Origin Data% Meta% Move Log Cpy%Sync Convert
home centos -wi-ao---- <45.12g
root centos -wi-ao---- 50.00g
swap centos -wi-ao---- <3.88g
[root@localhost ~]# lvdisplay
--- Logical volume ---
LV Path /dev/centos/swap
LV Name swap
VG Name centos
LV UUID 80HPrb-hDLI-Y6c8-4n1x-GZfI-U9qI-zMYmn1
LV Write Access read/write
LV Creation host, time localhost, 2023-07-19 20:11:36 -0400
LV Status available
# open 2
LV Size <3.88 GiB
Current LE 992
Segments 1
Allocation inherit
Read ahead sectors auto
- currently set to 8192
Block device 253:1
--- Logical volume ---
LV Path /dev/centos/home
LV Name home
VG Name centos
LV UUID 7TNJI6-WBN4-IJrH-OB9Z-JuIL-e7cA-VKfIuY
LV Write Access read/write
LV Creation host, time localhost, 2023-07-19 20:11:37 -0400
LV Status available
# open 1
LV Size <45.12 GiB
Current LE 11550
Segments 1
Allocation inherit
Read ahead sectors auto
- currently set to 8192
Block device 253:2
--- Logical volume ---
LV Path /dev/centos/root
LV Name root
VG Name centos
LV UUID MPkKt3-2yNl-2Ejp-FlMc-OM3y-Q605-zQiPkb
LV Write Access read/write
LV Creation host, time localhost, 2023-07-19 20:11:38 -0400
LV Status available
# open 1
LV Size 50.00 GiB
Current LE 12800
Segments 1
Allocation inherit
Read ahead sectors auto
- currently set to 8192
Block device 253:0
[root@localhost etc]# cat fstab
#
# /etc/fstab
# Created by anaconda on Wed Jul 19 20:11:39 2023
#
# Accessible filesystems, by reference, are maintained under '/dev/disk'
# See man pages fstab(5), findfs(8), mount(8) and/or blkid(8) for more info
#
/dev/mapper/centos-root / xfs defaults 0 0
UUID=aef31d2f-8529-4597-bd38-ea7403f9cd51 / boot xfs defaults 0 0
/dev/mapper/centos-home / home xfs defaults 0 0
/dev/mapper/centos-swap swap swap defaults 0 0
[root@localhost etc]# vi fstab
#
# /etc/fstab
# Created by anaconda on Wed Jul 19 20:11:39 2023
#
# Accessible filesystems, by reference, are maintained under '/dev/disk'
# See man pages fstab(5), findfs(8), mount(8) and/or blkid(8) for more info
#
/dev/mapper/centos-root / xfs defaults 0 0
UUID=aef31d2f-8529-4597-bd38-ea7403f9cd51 /boot xfs defaults 0 0
/dev/mapper/centos-home /home xfs defaults 0 0
/dev/mapper/centos-swap swap swap defaults 0 0
/dev/vg-volume1/volume1lv /volume1 ext4 defaults 0 0
/dev/vg-volume2/volume2lv /volume2 ext4 defaults 0 0
[root@localhost etc]# df -TH
Filesystem Type Size Used Avail Use% Mounted on
devtmpfs devtmpfs 2.0G 0 2.0G 0% /dev
tmpfs tmpfs 2.0G 11M 2.0G 1% /run
tmpfs tmpfs 2.0G 0 2.0G 0% /sys/fs/cgroup
/dev/mapper/centos-root xfs 54G 1.4G 53G 3% /
/dev/sda1 xfs 1.1G 157M 907M 15% /boot
/dev/mapper/centos-home xfs 49G 34M 49G 1% /home
/dev/mapper/vg--volume1-volume1lv ext4 53G 55M 50G 1% /volume1
/dev/mapper/vg--volume2-volume2lv ext4 53G 55M 50G 1% /volume2
[root@localhost etc]# umount -a
umount: /: target is busy.
(In some cases useful info about processes that use
the device is found by lsof(8) or fuser(1))
umount: /sys/fs/cgroup/systemd: target is busy.
(In some cases useful info about processes that use
the device is found by lsof(8) or fuser(1))
umount: /sys/fs/cgroup: target is busy.
(In some cases useful info about processes that use
the device is found by lsof(8) or fuser(1))
umount: /run: target is busy.
(In some cases useful info about processes that use
the device is found by lsof(8) or fuser(1))
umount: /dev: target is busy.
(In some cases useful info about processes that use
the device is found by lsof(8) or fuser(1))
[root@localhost etc]# df -TH
Filesystem Type Size Used Avail Use% Mounted on
devtmpfs devtmpfs 2.0G 0 2.0G 0% /dev
tmpfs tmpfs 2.0G 11M 2.0G 1% /run
tmpfs tmpfs 2.0G 0 2.0G 0% /sys/fs/cgroup
/dev/mapper/centos-root xfs 54G 1.4G 53G 3% /
[root@localhost etc]# mount -a
[root@localhost etc]# df -TH
Filesystem Type Size Used Avail Use% Mounted on
devtmpfs devtmpfs 2.0G 0 2.0G 0% /dev
tmpfs tmpfs 2.0G 11M 2.0G 1% /run
tmpfs tmpfs 2.0G 0 2.0G 0% /sys/fs/cgroup
/dev/mapper/centos-root xfs 54G 1.4G 53G 3% /
/dev/sda1 xfs 1.1G 157M 907M 15% /boot
/dev/mapper/centos-home xfs 49G 34M 49G 1% /home
/dev/mapper/vg--volume1-volume1lv ext4 53G 55M 50G 1% /volume1
/dev/mapper/vg--volume2-volume2lv ext4 53G 55M 50G 1% /volume2
Logon groups are used to automatically distribute user logons to individual instance or to group of SAP instances ( Application Server ) 로그온그룹이란 SAP Instance를그룹화하거나, 유저로그온시개별인스턴스에자동으로분배할수있도록하는데사용된다.
A user does not log on to a special instance but rather logs on to a so-called LOGON group, and is then logged on to the relevant instance with the lowest load 사용자는특정인스턴스에로그온하는것이아닌, 로그온그룹에속한부하가가장낮은인스턴스에로그인하는것으로로드밸런싱된다.
2. Logon Group 설정 ( Tcode : SMLG )
case ) Instance는 등록 돼 있지만, Logon Group이 없는 경우
1) Logon Group -> 사용하고자 하는 그룹 이름 입력 -> Copy
case ) 새로운 Logon Group에 인스턴스를 할당해 주고 싶은 경우
※ 아래의 예시는 Single Instance이지만, 여러개의 Instance를 가진 시스템의 경우 아래 방법을 통해 Instance별 Logon Group 관리 가능
1) Create Assignment
2) Logon Group 입력 및 Instance 설정
- 사용하고자 하는 Logon Group 입력 후, 할당하고자 하는 Instance 선택
✓ 다수의 Instance를 가진 시스템 예시는 아래와 같다. ✓ 4개의 Instance들은 기본적으로 Test Logon Group에 속해있지만, 4번 Instance의 경우 TEST_CO Logon Group에 추가로 속해있다.
SAP GUI는 사용자의 설정 및 Local configuration을 특정 파일들에 저장한다.
그 중, SAPGUILandscape.xml은 사용자가 설정한 SAP 접속 정보, 계층 정보, 설명 등이 저장돼 있다.
SAP GUI 최초 실행 시, local configuration 파일이 비어있는 채로 생성 된다.
SAP GUI 740까지는 saplogon.ini 파일과 SAPUILandscaple.xml 파일을 함께 사용할 수 있었지만, 750 이상부터는 SAPUILandscape.xml 파일을 사용한다.
2. SAPUILandscape.xml file information
해당 파일에는 Router entries, system status 확인을 위한 URL 등이 있지만 아래의 4가지가 가장 대표적인 정보이다.
Connections to SAP systems defined by the user 유저가 정의한 SAP system 연결 정보
Hierarchical structure on the SAP Logon items when using hierarchical view 계층 뷰를 보기 위해 사용되는 SAP Logon 항목 계층 구조 ( 폴더를 만들고 그 하단에 계층적으로 연결정보를 구성하는 것에 대한 정보 )
System description 시스템 설명
Message server entries 메시지 서버 접속 엔트리
3. Configuration file path
파일 경로는 SAP Logon -> Options -> SAP Logon Options -> Configuration Files 에서 확인 할 수 있다.
해당 경로에 saplogon.ini / SAPLogonTree.xml / saprules.xml 파일이 있는데 이는 구 버전에서 SAPUILandscape.xml의 역할을 했던 파일이다.
4. SAP GUI Version Upgrade
740 -> 750 이상으로 올라갈 경우 saplogon.ini / SapLogonTree.xml / saprules.xml 을 이용해 SAPUILandscape.xml 파일을 만들어 접속 정보를 정의할 수 있다.
1. saplogon.ini / SapLogonTree.xml / saprules.xml 파일을 백업
2. SAP GUI Version Upgrade 후 해당 경로에 생성 된 SAPUILandscape.xml / SAPUILandscapeGlobal.xml 삭제 ( SAP GUI 최초 실행 시 자동 생성 )
3. 백업 받은 세개의 파일을 Configuration Path에 덮어쓴 후, SAP GUI를 실행하면 해당 정보를 기반으로 SAPUILandscape.xml 및 SAPUILandscapeGlobal.xml 생성
설치 완료 후, $HOME/tmux/include 디렉토리에 ncurse라는 디렉토리가 생성되고, 해당 경로는 tmux 빌드 시 경로를 찾을 수 없다는 오류를 발생시키기 때문에 파일을 이동해주는 과정이 추가로 필요하다.
tar -xvzf ncurses-6.4.tar.gz
cd ncurses-6.4/
./configure --prefix=$HOME/tmux/
make
make install
# 폴더 이동
cp $HOME/tmux/include/ncurses/* $HOME/tmux/include/
tmux의 경우, flag 값 설정을 통해 include와 lib 폴더 경로를 지정해 줄 수 있다.
정상적으로 빌드가 진행되면, $HOME/tmux/bin 아래에 tmux 라는 파일이 생성된다.
tar -xvzf tmux-3.3a.tar.gz
cd tmux-3.3a
./configure \
CFLAGS="-I$HOME/tmux/include" \
LDFLAGS="-L$HOME/tmux/lib" \
--prefix=$HOME/tmux/
make
make install
tmux 실행 전, LD_LIBRARY_PATH 환경 변수 설정이 필요하다. Bash Shell의 경우 ~/.bashrc 파일에 추가하면 된다.
Terminal multiplexer의 약자로 여래 개의 터미널을 각각 독립적으로 사용할 수 있게 해주는 유틸리티
하나의 터미널에서 화면을 분할하게 사용할 수 있어 작업 효율을 높여준다 ( Panes 분할 )
영구적인 Session을 제공해주기 때문에 작업 중 ssh 서버와 접속이 끊겨도 작업중인 것들은 사라지지 않는다.
2. tmux 구성 요소
구성 요소 도식
Session ?
tmux의 가장 큰 단위로, 1개 이상의 window로 구성 될 수 있다.
사용자는 session에 attach / detach를 통해 session을 전환 할 수 있다.
detach를 하더라도 session은 background 에서 계속 실행된다.
session 목록과 각 세션이 가진 window 개수
Window ?
session 내에 존재하는 하나의 tab 단위
동일한 세션에서 시각적으로 분리된 단위로 브라우저 내 탭을 생각하면 된다.
예로 session이 하나의 브라우저라면 window는 브라우저 내의 각각의 탭으로 생각하면 된다.
watch session 내 0~1번, 총 2개의 window가 존재
Pane ?
하나의 윈도우 내에 분할 된 단위
하나의 윈도우가 여러개의 pane을 가질 수 있다.
[ Window 내 pane 2개로 분할 된 화면 ]
3. 명령어
- Session Command
✓ Session 외부에서 실행하는 명령어
# 세션 생성
tmux
# 세션 생성 ( 이름 지정 )
tmux new -s < session-name >
tmux new -s test_session
# 세션 목록 확인
tmux ls
# 세선 재접속 ( attached )
tmmux attach -t < session-name >
tmux new -s test_session
# 세션 종료
tmux kill -t < session-name >
tmux kill -t test_session
✓ Session 내부에서 실행하는 명령어
# 세션 이름 수정
Ctrl + b -> $
# 세션 종료 ( 아래의 세션 유지와 달리 아예 사라짐 )
exit
# 세션을 유지한 상태에서 나가기 ( Detached )
Ctrl + b -> d
- Window Command
# 윈도우 목록 보기
Ctrl + b -> w
# 새 윈도우 생성
Ctrl + b -> c
# 윈도우 이름 수정
Ctrl + b -> ,
# 윈도우 종료
Ctrl + b -> &
Ctrl + d
# 윈도우 이동
Ctrl + b -> 0~9 : window number
n : next window
p : previous window
l : last window
w : window selector
f : find by window
- Pane Command
# 화면 분할
# 좌우 분할
Ctrl + b -> %
# 상하 분할
Ctrl + b -> "
# 화면 이동 ( Pane 이동 )
Ctrl + b -> 방향키
# 화면 삭제
Ctrl + b -> x
# 마우스 휠 활성화
Ctrl + b -> [
# 예제 1 : 특정 경로로 이동 후, 현재 경로 출력
[user@localhost ~] $ function cdpwd {
> cd $1; pwd
}
[user@localhost ~] $ cdpwd /home
/home
[user@localhost: /home]
# 예제 2 : 특정 폴더 생성 후, 해당 폴더로 이동
[user@localhost ~] function mkcd {
> mkdir -p -- $1 && cd -- $1
> }
[user@localhost ~] mkcd /home/testdir
[user@localhost: /home/testdir]
✓ $ [숫자] : 숫자를 지정해 argument를 입력 받을 수 있다 ( 0번의 경우 함수를 가리키기 때문에 1번부터 사용 ) ✓ [ -p ] option : 경로의 중간이 비었으면 자동으로 함께 생성하는 옵션
- User alias는 "~/.bashrc", SYSTEM alias는 "/etc/bashrc" 파일에 작성하면 된다.
# 예제 1 : 특정 폴더 생성 후, 해당 폴더로 이동
[user@localhost ~] $ vi [ 각 파일 ]
mkcd () {
mkdir -p -- $1 && cd -- $1
}
wq!
# 실행이 되지 않을 경우 source ~/.bashrc 혹은 source /etc/bashrc로 활성화
- C Shell
Local alias 등록을 위한 방법은 아래와 같다.
# 예제 1 : 특정 경로로 이동 후, 현재 경로 출력
hostname:user > alias 'cd \!:1 && pwd'
hostname:user > cdpwd /home/user
/home/user
# 예제 2 : 특정 폴더 생성 후, 해당 폴더로 이동
hostname:user > alias mkcd 'mkdir -p -- \!:1 && cd -- \!:1'
hostname:user > mkcd /home/user/testdir
hostname:user > pwd
/home/user/testdir
sapstartsrv process와의 통신을 통해 시스템을 시작 및 종료 할 수 있는 커맨드 툴이다
✓ sapstartsrv ? sap instance를 관리하기 위한 linux service deamon으로, 해당 서비스가 작동하지 않으면 start, stop이 불가능하다.
과거에 사용하던 'startsap' 과 'stopsap' 명령어는 몇몇 이슈가 있어 SAP에서 사용을 권장하지 않고, 2015년부터 더 이상 지원 및 사용이 되지 않는다 (deprecated).
2. SAP SYSTEM vs SAP Instance
- sapcontrol 명령어를 적절히 사용하기 위해서는 SAP system과 SAP instance의 차이를 알아야 한다.
✓ SAP instance
SAP Instance는 application 및 database server에 필요한 memory, work process와 같은 자원들의 집합체이다.
또한, Instance는 서버에 설치된 어플리케이션이 실행 및 관리를 담당한다.
✓ SAP SYSTEM
SAP SYSTEM은 하나 이상의 인스턴스를 가진 시스템으로 구성된다.
SYSTEM은 인스턴스를 관리하기 위한 다른 프로세스 또한 포함하고 있다.
3. sapcontrol command
- SAP Document about sapcontrol command : https://help.sap.com/docs/SLTOOLSET/9338236b61554ba194f10c236e0237d0/0a2f54809e064ee68b02fb9fb392bafd.html?version=CURRENT_VERSION&locale=en-US
- SAP Server에 접속 후, sidadm으로 계정을 전환한다.
- sapcontrol 메뉴얼 보기
sapcontrol -help
- SAP SYSTEM Instance List 확인
아래의 명령어를 사용할 경우 SAP SYSTEM 상의 모든 인스턴스 목록을 조회 할 수 있다.